Moving WordPress website to a new host can be a tough and stressful experience using a manual process like importing database and website files into new hosting. Also, there is enough fear as old and new hosting can create conflict with technical or programming language versions. But it doesn’t need to be when you have a good plugin to do that. There is a lot of plugin in WordPress plugins archives and usually, I use ‘All-in-One WP Migration‘ for its simplicity and perfections.
The plugin exports WordPress website including the database, media files, plugins and themes with no technical knowledge required. Upload your site to a different location with a drag and drop into WordPress website easily.
Let’s start the game
- Go to Admin Dashboard > Plugins > Add new and search for ‘All in one WP Migration’ in the right-hand search field, then click ‘Install Now’ when you find the correct plugin from ServMask and ‘Activate’ the plugin.
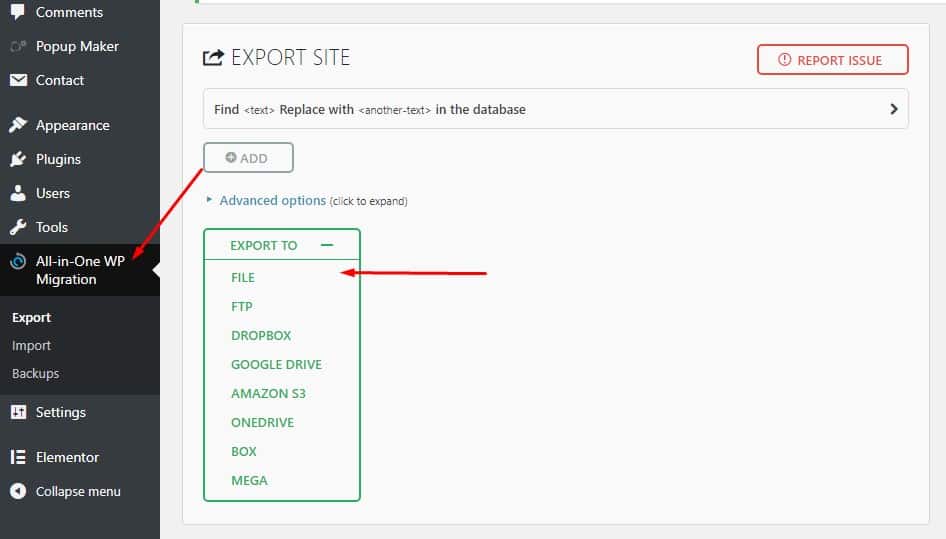
- Now, You will see a new option in left sidebar All in one WP Migration. You are set to Export, Import, and Backup your WordPress website.
- Let’s click on ‘Export‘ and you’ll see your display like below. You can export website file as a downloadable file, FTP, Google Drive, Dropbox etc. You will choose the one you preferred most. Usually, I download the website files as File. The website files will download as “.wpress” format.
- Now, It’s time to import the website files into new WordPress website. You should have installed a fresh WordPress website in your new domain/hosting.If you want to import the website into an existing website where there are contents like posts/pages/media files already then I’ll recommend to “Reset WordPress” website. You can check my previous article about HOW TO RESET WORDPRESS easily.

- On your new WordPress website Install and Activate ‘All in one WP Migration’ and click on ‘Import’. Then Drag the
.wpressfile you downloaded from your original site into the drag and drop window to start the import or you can choose the file from your Desktop. - Once the file has finished importing click “Continue”. Since this is a new install of your original website so database new already, you don’t need to worry about anything being overwritten.
- After a few moment, you will find a green signal “Your data is imported successfully“. Then you have to log in again with your previous website Username & Password and change the permalink from Admin Dashboard > Setting > Permalinks, Click on Post Name (Should be already selected) and Save Changes!
That’s it! You should see the website as same as the one you’ve exported from.
Comment below your opinion or if you face any issue and I’ll try my best assist you.
Tricks: All-in-One WP Migration supports only 512MB file to Export and Import. If you want more to export and import then you have to buy the PRO version of the plugin(Recommended). BUT I’ve got a little trick to overcome the issue 🙂 Go to Admin Dashboard > Plugins > Editor > All-in-One WP Migration > constants.php
Find code “Max File Size” and change the current size “536870912” to as big as you want. I just put 1 “Zero” at last (that means 5368709120) and all set for me to import/export 5GB 🙂 It works for me!
Thanks & Regards
D!

